
Ads

Crochet Baby Dress You Can Easily Make – Step-by-Step Guide

 Crocheting a baby dress is a rewarding and heartwarming project, perfect for gifting or dressing up your little one. This step-by-step guide will walk you through creating a simple yet beautiful crochet baby dress that is comfortable, stylish, and easy to make. Whether you’re a beginner or an experienced crocheter, this pattern is designed for ease and elegance.

Materials Needed:

  • Yarn: Soft, lightweight DK or worsted-weight cotton or acrylic yarn
  • Hook: Size G (4.0 mm) or H (5.0 mm) crochet hook
  • Scissors
  • Yarn needle
  • Stitch markers (optional)
  • Buttons or ribbons (for embellishment, optional)

Step 1: Understanding the Dress Structure

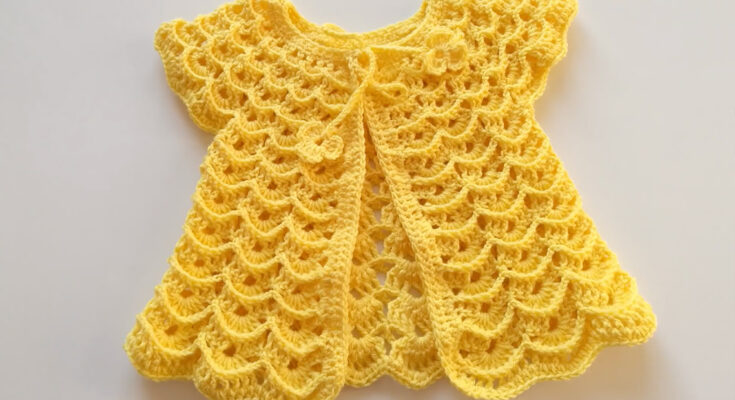
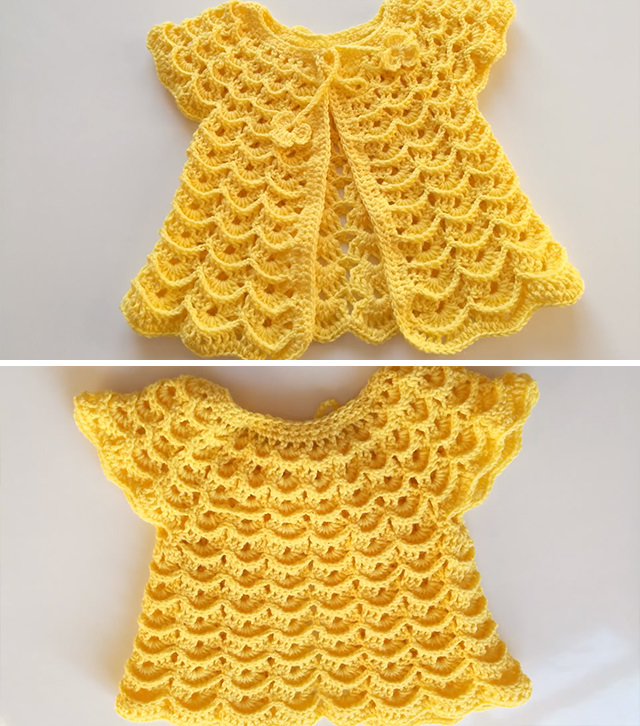
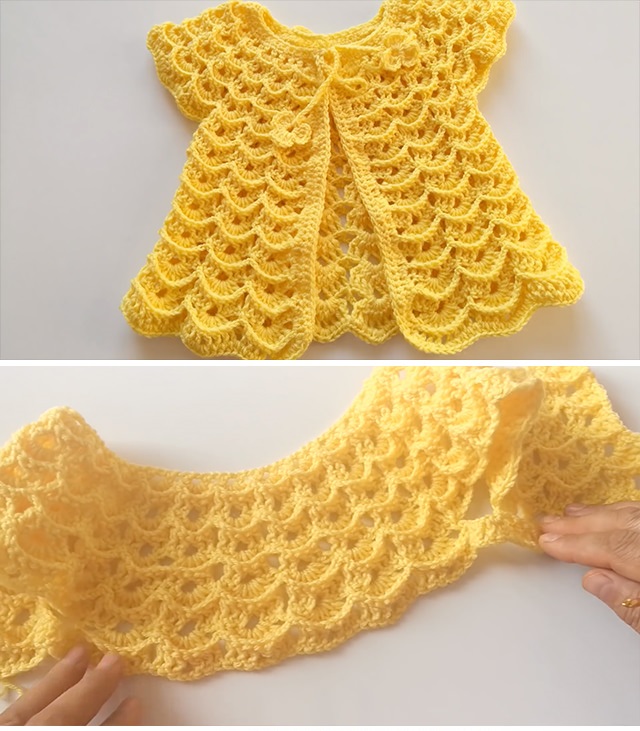
This baby dress is crocheted from the top down, starting with the yoke and increasing to create the bodice and skirt. It is designed to be worked in one piece, minimizing sewing.

  1. Foundation Chain: Start with a chain of 50 (adjust for different sizes).
  2. Row 1: Double crochet (DC) in the 4th chain from the hook and across. (48 DC)
  3. Row 2: Chain 3 (counts as first DC), turn. Work 2 DC in the next stitch, DC in the next 6 stitches, 2 DC in the next stitch. Repeat across. (54 DC)
  4. Row 3-5: Continue increasing by adding stitches in regular intervals to shape the yoke.
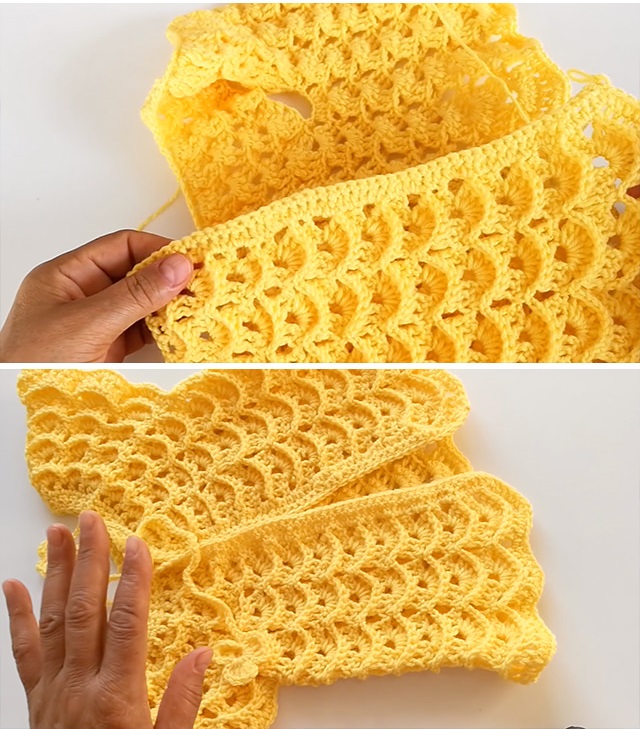
  5. Creating the Armholes: Fold the piece in half, skipping a section for the sleeves. Join with slip stitches to form the bodice opening.

Step 3: Crocheting the Bodice & Skirt

  1. Bodice Rows: Work even rows of DC until the bodice reaches the desired length (usually 3-5 inches from the yoke).
  2. Skirt Section: Begin increasing stitches gradually for a flared effect.
  3. Shell Stitch Option: For a decorative touch, use 5 DC in one stitch, skip 1 stitch, SC in the next stitch, repeating across.
  4. Continue Working Rows: Repeat the pattern until the skirt reaches the desired length.

Step 4: Adding Finishing Touches

  • Edging: Add a simple picot or scalloped edging around the hem and sleeves for a polished look.
  • Buttons or Ribbon Closure: Attach small buttons or a satin ribbon at the back for fastening.
  • Flower or Bow Embellishments: Crochet small flowers or bows to sew onto the dress.

Creative Variations

  • Lacy Baby Dress: Use an openwork pattern for a more delicate look.
  • Striped Dress: Change yarn colors every few rows for a striped effect.
  • Matching Accessories: Create a headband or booties using the same pattern for a complete outfit.

Final Thoughts

Crocheting a baby dress is a delightful and satisfying project. With simple stitches and creative customization, you can craft a beautiful, handmade garment that will be cherished for years to come.

Happy Crocheting!

Tutorial and photos of this baby dress by: Örgü Aşkım Bebeğim.

Comments

Popular Posts

How to crochet a baby cardigan “Kriss Cross”

The “Criss Cross” baby cardigan is a charming and versatile crochet project suitable for various skill levels. This design features a textured crossed double crochet stitch that adds both visual interest and warmth. Below is a detailed guide to help you create this delightful piece.  Materials You’ll Need Yarn : Approximately 220–950 meters of DK (weight 3) yarn, depending on the size you choose. Crochet Hook : 4.0 mm (G) hook. Buttons : 5–7 buttons, each 15 mm in diameter. Tapestry Needle : For weaving in ends and sewing on buttons. Scissors : For cutting yarn. Baby Crochet Designs+3Ravelry+3Etsy+3 Etsy+1Ravelry+1  Available Sizes The pattern accommodates a wide range of sizes, from Preemie up to 10 years old. Specific measurements and stitch counts vary by size, so it’s essential to refer to the pattern for detailed instructions. Baby Crochet Designs+2Ravelry+2Etsy+2  Key Stitches & Techniques sc : Single Crochet dc : Double Crochet cc : Criss Cross (skip one stitch...

How to Make Simple crochet balaclava/snood/scarf

  Sure! Here’s a  detailed guide  on how to  make a simple crochet balaclava, snood, or scarf , ideal for beginners and easy to adapt depending on your style or warmth preferences.  MATERIALS NEEDED: Yarn : Medium weight yarn (Category 4) – acrylic or wool-blend for warmth Crochet hook : Size 5.0 mm (H-8) or appropriate for your yarn Scissors Yarn needle : For weaving in ends Measuring tape Stitch markers  (optional) 1.   BASIC STITCHES TO KNOW: Chain (ch) Slip stitch (sl st) Single crochet (sc) Half double crochet (hdc)  – optional Double crochet (dc)  – optional  OPTION 1: Simple  Scarf  Pattern: Foundation chain : Chain 25 (or however wide you want your scarf). Row 1 : Single crochet in the second chain from hook and across. (24 stitches) Row 2 : Ch 1, turn, sc in each stitch across. Repeat Row 2  until the scarf measures your desired length (typical scarves are 60–70 inches long). Finish off  and weave in end...

Easy Crochet Pattern: Beautiful Deni Bag Tutorial

  Here’s a detailed explanation of   how to make an easy crochet Deni bag , which you can use as a guide for creating a   video tutorial   or simply follow to make the bag yourself. The Deni bag is known for its simple construction, elegant look, and practicality. This guide will walk you through everything from materials to finishing touches.   Easy Crochet Pattern: Beautiful Deni Bag Tutorial   Overview This easy crochet bag pattern is beginner-friendly, stylish, and versatile. You’ll use basic stitches to create a sturdy rectangular base, build up the body, and finish with handles. Perfect for everyday use or as a handmade gift.   Video Tutorial Structure (for YouTube or Reels)   Intro (0:00–0:30) Show a finished Deni bag. Mention the level (Beginner-friendly). Display a list of required materials.   Materials Needed Item Description Yarn Cotton or poly-blend yarn (medium-weight, e.g. size 4) Crochet hook 4.0mm–5.0mm (check yarn label) Sci...

Ads